

搜索到
195
篇与
后端
的结果
-
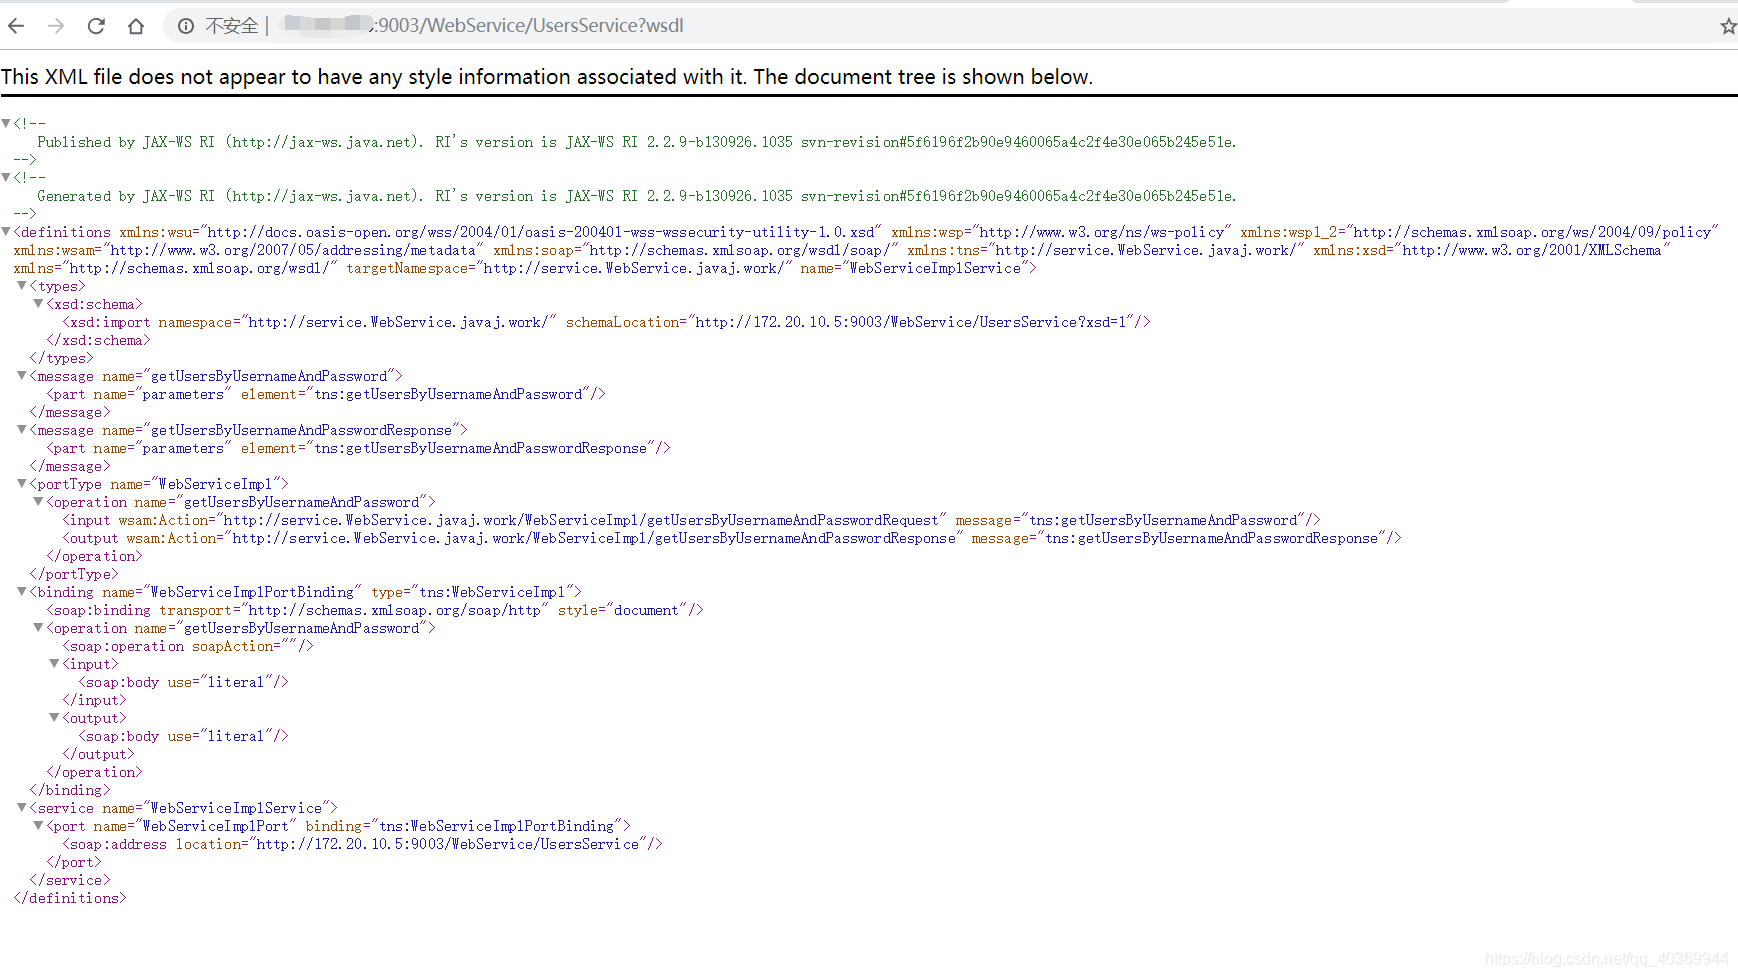
 JDK开发WebServrice 前言前言摘自:https://blog.csdn.net/qq_33326449/article/details/52973297 什么是webservice?一句话概括:WebService是一种跨编程语言和跨操作系统平台的远程调用技术。所谓跨编程语言和跨操作平台,就是说服务端程序采用Java编写,客户端程序则可以采用其他编程语言编写,反之亦然!跨操作系统平台则是指服务端程序和客户端程序可以在不同的操作系统上运行。所谓远程调用,就是一台计算机a上的一个程序可以调用到另外一台计算机b上的一个对象的方法。譬如从天气预报系统中获取某个城市的天气数据在自己系统中进行展示;从证券交易系统中获取某只股票的交易信息在自己的系统中进行展示;又譬如一个商城系统中能够展示快递的跟踪信息,而这些信息就是通过webservice从具体的快递公司的系统中获取的数据。其实可以从多个角度来理解WebService,从表面上看,WebService就是一个应用程序向外界暴露出一个能通过Web进行调用的API,也就是说能用编程的方法通过Web来调用这个应用程序。我们把调用这个WebService的应用程序叫做客户端,而把提供这个WebService的应用程序叫做服务端。从深层次看,WebService是建立可互操作的分布式应用程序的新平台,是一个平台,是一套标准。它定义了应用程序如何在Web上实现互操作性,你可以用任何你喜欢的语言,在任何你喜欢的平台上写Web service ,只要我们可以通过Web service标准对这些服务进行查询和访问。二.WSDL是什么,有什么作用?WSDL是web service definition language的缩写,即web service的定义(描述)语言。怎样向别人介绍你的 web service 有什么功能,以及每个函数调用时的参数呢?你可能会自己写一套文档,你甚至可能会口头上告诉需要使用你的web service的人。这些非正式的方法至少都有一个严重的问题:当程序员坐到电脑前,想要使用你的web service的时候,他们的工具(如Visual Studio)无法给他们提供任何帮助,因为这些工具根本就不了解你的web service。解决方法是:用机器能阅读的方式提供一个正式的描述文档。web service描述语言(WSDL)就是这样一个基于XML的语言,用于描述web service及其函数、参数和返回值。因为是基于XML的,所以WSDL既是机器可阅读的,又是人可阅读的,这将是一个很大的好处。一些最新的开发工具既能根据你的web service生成WSDL文档,又能导入WSDL文档,生成调用相应web service的代码。Webservice服务发布之后,通过浏览器访问发布的+?wsdl即可获得wsdl文档。三.WSDL文档主要有那几部分组成,分别有什么作用?一个WSDL文档的根元素是definitions元素,WSDL文档包含7个重要的元素:types, import, message, portType, operations, binding和service元素。1、 definitions元素中一般包括若干个XML命名空间;2、 Types元素用作一个容器,定义了自定义的特殊数据类型,在声明消息部分(有效负载)的时候,messages定义使用了types元素中定义的数据类型与元素;3、 Import元素可以让当前的文档使用其他WSDL文档中指定命名空间中的定义;4、 Message元素描述了Web服务的有效负载。相当于函数调用中的参数和返回值;5、 PortType元素定义了Web服务的抽象接口,它可以由一个或者多个operation元素,每个operation元素定义了一个RPC样式或者文档样式的Web服务方法;6、 Operation元素要用一个或者多个messages消息来定义它的输入、输出以及错误;7、 Binding元素将一个抽象的portType映射到一组具体的协议(SOAP或者HTTP)、消息传递样式(RPC或者document)以及编码样式(literal或者SOAP encoding);8、 Service元素包含一个或者多个Port元素每一个Port元素对应一个不同的Web服务,port将一个URL赋予一个特定的binding,通过location实现。可以使两个或者多个port元素将不同的URL赋给相同的binding。四.SOAP是什么? SOAP是simple object access protocal的缩写,即简单对象访问协议。 是基于XML和HTTP的一种通信协议。是webservice所使用的一种传输协议,webservice之所以能够做到跨语言和跨平台,主要是因为XML和HTTP都是独立于语言和平台的。Soap的消息分为请求消息和响应消息,一条SOAP消息就是一个普通的XML文档,包含下列元素:1、 必需的 Envelope 元素,可把此XML文档标识为一条SOAP消息2、 可选的 Header 元素,包含头部信息3、 必需的 Body 元素,包含所有的调用和响应信息4、 可选的 Fault 元素,提供有关在处理此消息所发生错误的信息 Soap请求消息 Soap响应消息 五.怎么理解UDDI?UDDI是Universal Description Discovery and Integration的缩写,即统一描述、发现和整合规范。用来注册和查找服务,把web services收集和存储起来,这样当别人访问这些信息的时候就从UDDI中查找,看有没有这个信息存在。五.Webservice的SEI指什么?WebService EndPoint Interface(webservice终端[Server端]接口)就是 WebService服务器端用来处理请求的接口六.说说你知道的webservice框架,他们都有什么特点?Webservice常用框架有JWS、Axis2、XFire以及CXF。下面分别介绍一个这几种Web Service框架的基本概念1、JWS是Java语言对WebService服务的一种实现,用来开发和发布服务。而从服务本身的角度来看JWS服务是没有语言界限的。但是Java语言为Java开发者提供便捷发布和调用WebService服务的一种途径。2、Axis2是Apache下的一个重量级WebService框架,准确说它是一个Web Services / SOAP / WSDL 的引擎,是WebService框架的集大成者,它能不但能制作和发布WebService,而且可以生成Java和其他语言版WebService客户端和服务端代码。这是它的优势所在。但是,这也不可避免的导致了Axis2的复杂性,使用过的开发者都知道,它所依赖的包数量和大小都是很惊人的,打包部署发布都比较麻烦,不能很好的与现有应用整合为一体。但是如果你要开发Java之外别的语言客户端,Axis2提供的丰富工具将是你不二的选择。3、XFire是一个高性能的WebService框架,在Java6之前,它的知名度甚至超过了Apache的Axis2,XFire的优点是开发方便,与现有的Web整合很好,可以融为一体,并且开发也很方便。但是对Java之外的语言,没有提供相关的代码工具。XFire后来被Apache收购了,原因是它太优秀了,收购后,随着Java6 JWS的兴起,开源的WebService引擎已经不再被看好,渐渐的都败落了。4、CXF是Apache旗下一个重磅的SOA简易框架,它实现了ESB(企业服务总线)。CXF来自于XFire项目,经过改造后形成的,就像目前的Struts2来自WebWork一样。可以看出XFire的命运会和WebWork的命运一样,最终会淡出人们的视线。CXF不但是一个优秀的Web Services / SOAP / WSDL 引擎,也是一个不错的ESB总线,为SOA的实施提供了一种选择方案,当然他不是最好的,它仅仅实现了SOA架构的一部分。注:对于Axis2与CXF之间的关系,一个是Axis2出现的时间较早,而CXF的追赶速度快。如何抉择: 1、如果应用程序需要多语言的支持,Axis2应当是首选了;2、如果应用程序是遵循 spring哲学路线的话,Apache CXF是一种更好的选择,特别对嵌入式的Web Services来说;3、如果应用程序没有新的特性需要的话,就仍是用原来项目所用的框架,比如 Axis1,XFire,Celtrix或BEA等等厂家自己的Web Services实现,就别劳民伤财了。七.你的系统中是否有使用到webservice开发,具体是怎么实现的?如果你觉得自己掌握的不够好,对自己不够自信的可以回答为“我的系统中没有使用到webservice的开发,但是我掌握webservice开发的概念和流程”,然后可以给他讲讲相关的概念,也就是上面的这些问题的回答,这样可以绕过这个问题,因为并不是所有的系统都会涉及到webservice的开发。另一种回答即是先给他介绍一种webservice开发框架,比如CXF,然后告诉他你做的是服务端开发还是客户端开发,如果你说你做的事服务端开发,那么你就告诉他怎么定义的webservice,使用了哪些注解,怎么跟spring进行的整合,怎么发布的服务等等;如果你告诉他你做的事客户端的开发,那么你可以告诉他你怎么生成的本地代码,然后又怎么通过本地代码去调用的webservice服务。 一、开发WebService服务器端第一步:创建Java工程 ,创建相应的包(服务端)使用JDK开发(1.6以上版本)第二步:建一个接口WebServiceI,创建方法:import javax.jws.WebMethod; import javax.jws.WebService; @WebService //使用@WebService注解标注WebServiceI接口 public interface WebServiceI { /** * 根据用户名和密码得到该用户的信息 * * @param username * @param password * @return */ @WebMethod //使用WebMethod注解标注WebService接口中的方法 public String getUsersByUsernameAndPassword(String username, String password); }第三步:编写WebServiceI接口的实现类WebServiceImpl,使用@WebService注解标注实现类,并实现接口所有方法:import javax.jws.WebService; @WebService //使用@WebService注解标注WebServiceI接口的实现类 public class WebServiceImpl implements WebServiceI { @Override public String getUsersByUsernameAndPassword(String username, String password) { // TODO Auto-generated method stub //可调用dao String str ="账户:"+username+",密码:"+password; return str; } }第四步:写发布类WebServicePublish,使用Endponit(终端)类发布WebServiceimport work.javaj.WebService.service.WebServiceImpl; import javax.xml.ws.Endpoint; /** * 发布类WebServicePublish,使用Endponit(终端)类发布WebService * @author Administrator * @data 2018年9月18日 * @time 下午2:24:09 */ public class WebServicePublish { public static void main(String[] args) { //ip 为本地ip String address="http://ip:9003/WebService/UsersService"; Endpoint.publish(address, new WebServiceImpl()); System.err.println("发布成功"); } }浏览器测试:二、客户端(终端)访问WebService第一步:创建终端工程,主要用来实现接收服务端的暴露。第二步:找到客户端源代码路径(包路径) 在命令框中输入(shift+右键):wsimport -keep http://192.168.43.82:9003/WebService/UsersService?wsdl 第三步:创建Test.java测试类,在main方法中: /** *WebServiceClient测试类 * @author Administrator * @data 2018年9月18日 * @time 下午2:45:26 */ public class Test { public static void main(String[] args) { //先创建服务对象 WebServiceImplService webServiceImplService = new WebServiceImplService(); //根据服务对象得到端口 WebServiceImpl webServiceImplPort = webServiceImplService.getWebServiceImplPort(); //通过端口调用暴露的方法 String usersByUsernameAndPassword = webServiceImplPort.getUsersByUsernameAndPassword("admin", "123456"); System.out.println(usersByUsernameAndPassword); } }
 -
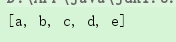
Set集合排序 TreeSetTreeSet中存储的类型必须是一致的,不能一下存int,一下又存string 当向TreeSet中添加自定义对象时,有2种排序方法,1:自然排序 2、定制排序 自然排序:要求自定义类实现java.lang.Comparable接口并重写compareTo(Object obj)方法。在此方法中,指明按照自定义类的哪个属性进行排序1.自然排序 @Test public void t1(){ Set<String> s = new TreeSet<String>(); s.add("d"); s.add("a"); s.add("e"); s.add("c"); s.add("b"); System.out.println(s); }输出结果:2.倒序若想它倒序输出,可以指定一个规则让他倒序输出 @Test public void t2(){ Set<String> set = new TreeSet<String>(new MyComparator()); set.add("a"); set.add("b"); set.add("c"); set.add("d"); set.add("e"); set.add("A"); for(Iterator<String> iterator = set.iterator(); iterator.hasNext();){ System.out.print(iterator.next()+" "); } } class MyComparator implements Comparator<String> { @Override public int compare(String o1, String o2) { return o2.compareTo(o1);//降序排列 } }输出结果: 如果Set集合中放入的是我们自己定义的一个类类型呢?注意:一定要定义一个排序规则类实现Comparator接口,与上面的方法类似@Test public void t3(){ Set<Person> set = new TreeSet<Person>(new PersonComparator()); Person p1 = new Person(10); Person p2 = new Person(20); Person p3 = new Person(30); Person p4 = new Person(40); set.add(p1); set.add(p2); set.add(p3); set.add(p4); for(Iterator<Person> iterator = set.iterator();iterator.hasNext();){ System.out.print(iterator.next().score+" "); } } class Person{ int score; public Person(int score){ this.score = score; } public String toString(){ return String.valueOf(this.score); } } class PersonComparator implements Comparator<Person>{ @Override public int compare(Person o1, Person o2) { return o1.score - o2.score; } }如果按分数倒序排列,只需要更改compare方法中的o2.score-o1.score
-
mysql 数据库引擎 一、数据库引擎 数据库引擎是用于存储、处理和保护数据的核心服务。利用数据库引擎可控制访问权限并快速处理事务,从而满足企业内大多数需要处理大量数据的应用程序的要求。 使用数据库引擎创建用于联机事务处理或联机分析处理数据的关系数据库。这包括创建用于存储数据的表和用于查看、管理和保护数据安全的数据库对象(如索引、视图和存储过程)。二、数据库引擎任务 在数据库引擎文档中,各主题的顺序遵循用于实现使用数据库引擎进行数据存储的系统的任务的主要顺序。设计并创建数据库以保存系统所需的关系或XML文档实现系统以访问和更改数据库中存储的数据。包括实现网站或使用数据的应用程序,还包括生成使用SQL Server工具和实用工具以使用数据的过程。为单位或客户部署实现的系统提供日常管理支持以优化数据库的性能三、MySQL数据库引擎类别 你能用的数据库引擎取决于mysql在安装的时候是如何被编译的。要添加一个新的引擎,就必须重新编译MYSQL。在缺省情况下,MYSQL支持三个引擎:ISAM、MYISAM和HEAP。另外两种类型INNODB和BERKLEY(BDB),也常常可以使用。ISAM ISAM是一个定义明确且历经时间考验的数据表格管理方法,它在设计之时就考虑到数据库被查询的次数要远大于更新的次数。因此,ISAM执行读取操作的速度很快,而且不占用大量的内存和存储资源。ISAM的两个主要不足之处在于,它不支持事务处理,也不能够容错:如果你的硬盘崩溃了,那么数据文件就无法恢复了。如果你正在把ISAM用在关键任务应用程序里,那就必须经常备份你所有的实时数据,通过其复制特性,MYSQL能够支持这样的备份应用程序。MYISAM MYISAM是MYSQL的ISAM扩展格式和缺省的数据库引擎。除了提供ISAM里所没有的索引和字段管理的功能,MYISAM还使用一种表格锁定的机制,来优化多个并发的读写操作。其代价是你需要经常运行OPTIMIZE TABLE命令,来恢复被更新机制所浪费的空间。MYISAM还有一些有用的扩展,例如用来修复数据库文件的MYISAMCHK工具和用来恢复浪费空间的MYISAMPACK工具。 MYISAM强调了快速读取操作,这可能就是为什么MYSQL受到了WEB开发如此青睐的主要原因:在WEB开发中你所进行的大量数据操作都是读取操作。所以,大多数虚拟主机提供商和INTERNET平台提供商只允许使用MYISAM格式。HEAP HEAP允许只驻留在内存里的临时表格。驻留在内存里让HEAP要比ISAM和MYISAM都快,但是它所管理的数据是不稳定的,而且如果在关机之前没有进行保存,那么所有的数据都会丢失。在数据行被删除的时候,HEAP也不会浪费大量的空间。HEAP表格在你需要使用SELECT表达式来选择和操控数据的时候非常有用。要记住,在用完表格之后就删除表格。INNODB和BERKLEYDB INNODB和BERKLEYDB(BDB)数据库引擎都是造就MYSQL灵活性的技术的直接产品,这项技术就是MYSQL++ API。在使用MYSQL的时候,你所面对的每一个挑战几乎都源于ISAM和MYISAM数据库引擎不支持事务处理也不支持外来键。尽管要比ISAM和MYISAM引擎慢很多,但是INNODB和BDB包括了对事务处理和外来键的支持,这两点都是前两个引擎所没有的。如前所述,如果你的设计需要这些特性中的一者或者两者,那你就要被迫使用后两个引擎中的一个了。四、mysql数据引擎更换方式1、查看当前数据库支持的引擎和默认的数据库引擎:show engines; 我的查询结果如下:2、更改数据库引擎2.1、更改方式1:修改配置文件my.ini 将my-small.ini另存为my.ini,在[mysqld]后面添加default-storage-engine=InnoDB,重启服务,数据库默认的引擎修改为InnoDB2.2、更改方式2:在建表的时候指定 建表时指定:create table mytbl( id int primary key, name varchar(50) )type=MyISAM;2.3、更改方式3:建表后更改 alter table mytbl2 type = InnoDB;3、查看修改结果 方式1:show table status from mytest; 方式2:show create table table_name五、MyIASM 和 Innodb引擎详解Innodb引擎 Innodb引擎提供了对数据库ACID事务的支持,并且实现了SQL标准的四种隔离级别,关于数据库事务与其隔离级别的内容请见数据库事务与其隔离级别这篇文章。该引擎还提供了行级锁和外键约束,它的设计目标是处理大容量数据库系统,它本身其实就是基于MySQL后台的完整数据库系统,MySQL运行时Innodb会在内存中建立缓冲池,用于缓冲数据和索引。但是该引擎不支持FULLTEXT类型的索引,而且它没有保存表的行数,当SELECT COUNT(*) FROM TABLE时需要扫描全表。当需要使用数据库事务时,该引擎当然是首选。由于锁的粒度更小,写操作不会锁定全表,所以在并发较高时,使用Innodb引擎会提升效率。但是使用行级锁也不是绝对的,如果在执行一个SQL语句时MySQL不能确定要扫描的范围,InnoDB表同样会锁全表。名词解析:ACIDA 事务的原子性(Atomicity):指一个事务要么全部执行,要么不执行.也就是说一个事务不可能只执行了一半就停止了.比如你从取款机取钱,这个事务可以分成两个步骤:1划卡,2出钱.不可能划了卡,而钱却没出来.这两步必须同时完成.要么就不完成.C 事务的一致性(Consistency):指事务的运行并不改变数据库中数据的一致性.例如,完整性约束了a+b=10,一个事务改变了a,那么b也应该随之改变.I 独立性(Isolation):事务的独立性也有称作隔离性,是指两个以上的事务不会出现交错执行的状态.因为这样可能会导致数据不一致.D 持久性(Durability):事务的持久性是指事务执行成功以后,该事务所对数据库所作的更改便是持久的保存在数据库之中,不会无缘无故的回滚.MyIASM引擎 MyIASM是MySQL默认的引擎,但是它没有提供对数据库事务的支持,也不支持行级锁和外键,因此当INSERT(插入)或UPDATE(更新)数据时即写操作需要锁定整个表,效率便会低一些。不过和Innodb不同,MyIASM中存储了表的行数,于是SELECT COUNT(*) FROM TABLE时只需要直接读取已经保存好的值而不需要进行全表扫描。如果表的读操作远远多于写操作且不需要数据库事务的支持,那么MyIASM也是很好的选择。两种引擎的选择 大尺寸的数据集趋向于选择InnoDB引擎,因为它支持事务处理和故障恢复。数据库的大小决定了故障恢复的时间长短,InnoDB可以利用事务日志进行数据恢复,这会比较快。主键查询在InnoDB引擎下也会相当快,不过需要注意的是如果主键太长也会导致性能问题,关于这个问题我会在下文中讲到。大批的INSERT语句(在每个INSERT语句中写入多行,批量插入)在MyISAM下会快一些,但是UPDATE语句在InnoDB下则会更快一些,尤其是在并发量大的时候。Index——索引 索引(Index)是帮助MySQL高效获取数据的数据结构。MyIASM和Innodb都使用了树这种数据结构做为索引。下面我接着讲这两种引擎使用的索引结构,讲到这里,首先应该谈一下B-Tree和B+Tree。MyIASM引擎的索引结构 MyISAM引擎的索引结构为B+Tree,其中B+Tree的数据域存储的内容为实际数据的地址,也就是说它的索引和实际的数据是分开的,只不过是用索引指向了实际的数据,这种索引就是所谓的非聚集索引。如下图所示: 这里设表一共有三列,假设我们以Col1为主键,则上图是一个MyISAM表的主索引(Primary key)示意。可以看出MyISAM的索引文件仅仅保存数据记录的地址。在MyISAM中,主索引和辅助索引(Secondary key)在结构上没有任何区别,只是主索引要求key是唯一的,而辅助索引的key可以重复。如果我们在Col2上建立一个辅助索引,则此索引的结构如下图所示: 同样也是一颗B+Tree,data域保存数据记录的地址。因此,MyISAM中索引检索的算法为首先按照B+Tree搜索算法搜索索引,如果指定的Key存在,则取出其data域的值,然后以data域的值为地址,读取相应数据记录。Innodb引擎的索引结构 与MyISAM引擎的索引结构同样也是B+Tree,但是Innodb的索引文件本身就是数据文件,即B+Tree的数据域存储的就是实际的数据,这种索引就是聚集索引。这个索引的key就是数据表的主键,因此InnoDB表数据文件本身就是主索引。 并且和MyISAM不同,InnoDB的辅助索引数据域存储的也是相应记录主键的值而不是地址,所以当以辅助索引查找时,会先根据辅助索引找到主键,再根据主键索引找到实际的数据。所以Innodb不建议使用过长的主键,否则会使辅助索引变得过大。建议使用自增的字段作为主键,这样B+Tree的每一个结点都会被顺序的填满,而不会频繁的分裂调整,会有效的提升插入数据的效率。两者区别: 第一个重大区别是InnoDB的数据文件本身就是索引文件。从上文知道,MyISAM索引文件和数据文件是分离的,索引文件仅保存数据记录的地址。而在InnoDB中,表数据文件本身就是按B+Tree组织的一个索引结构,这棵树的叶节点data域保存了完整的数据记录。这个索引的key是数据表的主键,因此InnoDB表数据文件本身就是主索引。 上图是InnoDB主索引(同时也是数据文件)的示意图,可以看到叶节点包含了完整的数据记录。这种索引叫做聚集索引。因为InnoDB的数据文件本身要按主键聚集,所以InnoDB要求表必须有主键(MyISAM可以没有),如果没有显式指定,则MySQL系统会自动选择一个可以唯一标识数据记录的列作为主键,如果不存在这种列,则MySQL自动为InnoDB表生成一个隐含字段作为主键,这个字段长度为6个字节,类型为长整形。 第二个与MyISAM索引的不同是InnoDB的辅助索引data域存储相应记录主键的值而不是地址。换句话说,InnoDB的所有辅助索引都引用主键作为data域。例如,下图为定义在Col3上的一个辅助索引: 这里以英文字符的ASCII码作为比较准则。聚集索引这种实现方式使得按主键的搜索十分高效,但是辅助索引搜索需要检索两遍索引:首先检索辅助索引获得主键,然后用主键到主索引中检索获得记录。 了解不同存储引擎的索引实现方式对于正确使用和优化索引都非常有帮助,例如知道了InnoDB的索引实现后,就很容易明白为什么不建议使用过长的字段作为主键,因为所有辅助索引都引用主索引,过长的主索引会令辅助索引变得过大。再例如,用非单调(可能是指“非递增”的意思)的字段作为主键在InnoDB中不是个好主意,因为InnoDB数据文件本身是一颗B+Tree,非单调(可能是指“非递增”的意思)的主键会造成在插入新记录时数据文件为了维持B+Tree的特性而频繁的分裂调整,十分低效,而使用自增字段作为主键则是一个很好的选择。转自:https://www.cnblogs.com/0201zcr/p/5296843.html
-
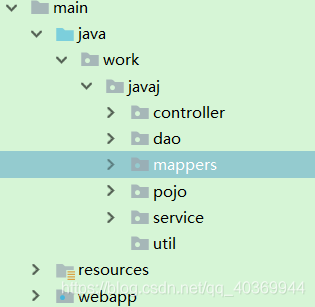
SSM整合(Spring+Spring MVC+Mybatis) 最近有空所以把以前做项目的框架做个简单的整合1.创建Maven项目,导入依赖<dependencies> <!--单元测试依赖--> <dependency> <groupId>junit</groupId> <artifactId>junit</artifactId> <version>4.12</version> <scope>test</scope> </dependency> <!--Servlet依赖--> <dependency> <groupId>javax.servlet</groupId> <artifactId>javax.servlet-api</artifactId> <version>4.0.0</version> <scope>provided</scope> </dependency> <!--jstl依赖--> <dependency> <groupId>javax.servlet</groupId> <artifactId>jstl</artifactId> <version>1.2</version> </dependency> <!--mysql数据库驱动依赖--> <dependency> <groupId>mysql</groupId> <artifactId>mysql-connector-java</artifactId> <version>5.1.38</version> </dependency> <!--c3p0依赖--> <dependency> <groupId>com.mchange</groupId> <artifactId>c3p0</artifactId> <version>0.9.5.2</version> </dependency> <!--spring-webmvc依赖--> <dependency> <groupId>org.springframework</groupId> <artifactId>spring-webmvc</artifactId> <version>5.0.8.RELEASE</version> </dependency> <dependency> <groupId>org.springframework</groupId> <artifactId>spring-jdbc</artifactId> <version>5.0.8.RELEASE</version> </dependency> <!--mybatis依赖--> <dependency> <groupId>org.mybatis</groupId> <artifactId>mybatis</artifactId> <version>3.4.6</version> </dependency> <!--mybatis-spring依赖--> <dependency> <groupId>org.mybatis</groupId> <artifactId>mybatis-spring</artifactId> <version>1.3.2</version> </dependency> <!-- jedis (一个redis client端的jar)--> <dependency> <groupId>redis.clients</groupId> <artifactId>jedis</artifactId> <version>2.9.0</version> </dependency> <!--fastjson依赖--> <dependency> <groupId>com.alibaba</groupId> <artifactId>fastjson</artifactId> <version>1.2.7</version> </dependency> </dependencies> <build> <finalName>ssm_redis</finalName> <resources> <resource> <directory>src/main/java</directory> <includes> <include>**/*.xml</include> </includes> </resource> </resources> <pluginManagement><!-- lock down plugins versions to avoid using Maven defaults (may be moved to parent pom) --> <plugins> <plugin> <artifactId>maven-clean-plugin</artifactId> <version>3.0.0</version> </plugin> <!-- see http://maven.apache.org/ref/current/maven-core/default-bindings.html#Plugin_bindings_for_war_packaging --> <plugin> <artifactId>maven-resources-plugin</artifactId> <version>3.0.2</version> </plugin> <plugin> <artifactId>maven-compiler-plugin</artifactId> <version>3.7.0</version> </plugin> <plugin> <artifactId>maven-surefire-plugin</artifactId> <version>2.20.1</version> </plugin> <plugin> <artifactId>maven-war-plugin</artifactId> <version>3.2.0</version> </plugin> <plugin> <artifactId>maven-install-plugin</artifactId> <version>2.5.2</version> </plugin> <plugin> <artifactId>maven-deploy-plugin</artifactId> <version>2.8.2</version> </plugin> </plugins> </pluginManagement> </build> </project> 2.根据个人习惯创建包 3.在resources中创建db.propertiesdb.driver=com.mysql.jdbc.Driver db.url=jdbc:mysql://127.0.0.1:3306/Bloggingplatform?characterEncoding=utf-8&allowMultiQueries=true db.user=root db.password=@838061522@ly #定义初始连接数 initPoolSize=3 #定义最大连接数 maxPoolSizes=30 4.在resources中创建spring.xml<?xml version="1.0" encoding="UTF-8"?> <beans xmlns="http://www.springframework.org/schema/beans" xmlns:aop="http://www.springframework.org/schema/aop" xmlns:context="http://www.springframework.org/schema/context" xmlns:tx="http://www.springframework.org/schema/tx" xmlns:mvc="http://www.springframework.org/schema/mvc" xmlns:xsi="http://www.w3.org/2001/XMLSchema-instance" xsi:schemaLocation="http://www.springframework.org/schema/beans http://www.springframework.org/schema/beans/spring-beans.xsd http://www.springframework.org/schema/aop http://www.springframework.org/schema/aop/spring-aop.xsd http://www.springframework.org/schema/context http://www.springframework.org/schema/context/spring-context.xsd http://www.springframework.org/schema/tx http://www.springframework.org/schema/tx/spring-tx.xsd http://www.springframework.org/schema/mvc http://www.springframework.org/schema/mvc/spring-mvc.xsd"> <!--自动扫描:自动扫描com.heyang.ssm包下所有类的注解--> <context:component-scan base-package="work.javaj"/> <!--加载db.properties--> <context:property-placeholder location="classpath:db.properties"></context:property-placeholder> <!--配置数据源 从c3p0--> <bean id="dataSource" class="com.mchange.v2.c3p0.ComboPooledDataSource"> <property name="driverClass" value="${db.driver}"></property> <property name="jdbcUrl" value="${db.url}"></property> <property name="user" value="${db.user}"></property> <property name="password" value="${db.password}"></property> <property name="initialPoolSize" value="${initPoolSize}"></property> <property name="maxPoolSize" value="${maxPoolSizes}"></property> </bean> <!--配置SqlSessionFactory--> <bean id="sqlSessionFactory" class="org.mybatis.spring.SqlSessionFactoryBean"> <!--加载数据源--> <property name="dataSource" ref="dataSource"></property> <!--加载MyBatis配置文件--> <!--<property name="configLocation" value="classpath:mybatis-Config.xml"></property>--> <!--加载所有映射文件--> <property name="mapperLocations" value="classpath:work/javaj/mappers/*.xml"></property> <!--typeAliasesPackage对应实体类所在的包,这个时候会自动取包名作为别名--> <property name="typeAliasesPackage" value="work.javaj.pojo"></property> </bean> <!--配置Dao层:spring注入这个bean--> <bean class="org.mybatis.spring.mapper.MapperScannerConfigurer"> <!--将sqlSessionFactory注入com.zking.dao包的类中,dao包中的类直接使用sqlSessionFactory--> <property name="sqlSessionFactoryBeanName" value="sqlSessionFactory"></property> <property name="basePackage" value="work.javaj.dao"></property> </bean> <!-- 事务管理 --> <bean id="transactionManager" class="org.springframework.jdbc.datasource.DataSourceTransactionManager"> <property name="dataSource" ref="dataSource"></property> </bean> <tx:annotation-driven transaction-manager="transactionManager" /> <tx:advice id="txAdvice" transaction-manager="transactionManager"> <tx:attributes> <tx:method name="query*" propagation="REQUIRED" read-only="true" /> <tx:method name="expand*" propagation="REQUIRED" read-only="true" /> <tx:method name="save*" propagation="REQUIRED" rollback-for="Exception"/> <tx:method name="insert*" propagation="REQUIRED" rollback-for="Exception" /> <tx:method name="delete*" propagation="REQUIRED" rollback-for="Exception"/> <tx:method name="update*" propagation="REQUIRED" rollback-for="Exception"/> </tx:attributes> </tx:advice> </beans> 5.在pojo中创建实体类public class Article implements Serializable{ private static final long serialVersionUID = 1L; private String aId; //文章id private String aTitle; //标题 private String aContent; //内容 private String aTitleImg; //标题图片 private String aTime; //时间 private Integer aReadingQuantity; //阅读量 private Integer aCommentnum; //评论数 private Programa programa;//栏目id 外键 private String label;//标签 private Administrator administrator;//管理员id 外键 private Integer aStatusBar; //状态 0不公开 1公开 private String aAbstract;//摘要 //此处省略setter和getter } 6.创建dao接口 ArticleDao public interface ArticleDao { /* * @Author Uncle Liu * @Description //TODO 根据id查询Article * @Date 18:36 2018/10/30 **/ Article getArticleById(String aId); } 7.创建service接口及实现类7.1 创建ArticleService public interface ArticleService { /* * @Author Uncle Liu * @Description //TODO 根据id查询Article * @Date 18:36 2018/10/30 **/ Article getArticleById(String aId); } 7.2 创建ArticleImpl@Service("articleImpl") public class ArticleImpl implements ArticleService { @Resource private ArticleDao articleDao; @Override public Article getArticleById(String aId) { return articleDao.getArticleById(aId); } } 8.在mappers中创建ArticleMapper.xml<?xml version="1.0" encoding="UTF-8"?> <!DOCTYPE mapper PUBLIC "-//mybatis.org//DTD Mapper 3.0//EN" "http://mybatis.org/dtd/mybatis-3-mapper.dtd"> <mapper namespace="work.javaj.dao.ArticleDao"> <!--映射Article对象的resultMap(结果映射集)--> <resultMap id="articleMapper" type="work.javaj.pojo.Article"> <id property="aId" column="a_id" /> <result property="aTitle" column="a_title" /> <result property="aContent" column="a_content" /> <result property="aTitleImg" column="a_title_img" /> <result property="aTime" column="a_time" /> <result property="aReadingQuantity" column="a_reading_quantity" /> <result property="aCommentnum" column="a_commentnum" /> <result property="aStatusBar" column="a_status_bar" /> <result property="label" column="label" /> <result property="aAbstract" column="a_abstract" /> <!--<association property="administrator" column="u_id" select="work.javaj.dao.AdministratorDao.getAdministratorById"/>--> <!--<association property="programa" column="p_id" select="work.javaj.dao.ProgramaDao.getProgramaById"/>--> </resultMap> <!--根据id查询--> <select id="getArticleById" parameterType="String" resultMap="articleMapper"> select a_abstract,a_id,a_title,a_content,a_title_img,a_time,a_reading_quantity,a_commentnum,p_id,label,a_status_bar,u_id from article where a_id=#{aId} </select> </mapper> 9.配置web.xml<?xml version="1.0" encoding="UTF-8"?> <web-app xmlns:xsi="http://www.w3.org/2001/XMLSchema-instance" xmlns="http://java.sun.com/xml/ns/javaee" xsi:schemaLocation="http://java.sun.com/xml/ns/javaee http://java.sun.com/xml/ns/javaee/web-app_3_0.xsd" version="3.0"> <display-name>Archetype Created Web Application</display-name> <welcome-file-list> <welcome-file>index.jsp</welcome-file> </welcome-file-list> <!-- Spring整合mybatis的配置文件 --> <context-param> <param-name>contextConfigLocation</param-name> <param-value>classpath:spring.xml</param-value> </context-param> <!--配置编码过滤器 防止乱码--> <filter> <filter-name>encodingFilter</filter-name> <filter-class>org.springframework.web.filter.CharacterEncodingFilter</filter-class> <init-param> <param-name>encoding</param-name> <param-value>UTF-8</param-value> </init-param> </filter> <filter-mapping> <filter-name>encodingFilter</filter-name> <url-pattern>/*</url-pattern> </filter-mapping> <!--spring mvc前端控制器--> <servlet> <servlet-name>SpringMVC</servlet-name> <servlet-class>org.springframework.web.servlet.DispatcherServlet</servlet-class> <init-param> <param-name>contextConfigLocation</param-name> <param-value>classpath:spring.xml</param-value> </init-param> <load-on-startup>1</load-on-startup> </servlet> <servlet-mapping> <servlet-name>SpringMVC</servlet-name> <url-pattern>*.do</url-pattern> </servlet-mapping> <!--spring监听器--> <listener> <listener-class>org.springframework.web.context.ContextLoaderListener</listener-class> </listener> </web-app> 10.创建Controller@Controller @RequestMapping("/index") public class indexController { @Resource private ArticleService articleService; @RequestMapping("/a") @ResponseBody public String index(){ //根据id查询 Article article = articleService.getArticleById("91cf33d3-2b96-45e8-a66d-ffd7fabb8de8"); System.out.println(article); return "Hello"; } } 11.创建index.jsp<%@ page contentType="text/html;charset=UTF-8" language="java" %> <html> <head> <title>Title</title> </head> <body> <a href="/index/a.do">你好</a> </body> </html> 12.测试12.1 运行结果:12.2 控制台输出结果:12.3 页面显示
-
SSM 整合之文件上传 ssm整合:https://blog.csdn.net/qq_40369944/article/details/842567671.在spring.xml添加 <!--配置MultipartResolver:用于处理表单中的file--> <!-- 文件上传配置,这里id的名称固定写法 --> <bean id="multipartResolver" class="org.springframework.web.multipart.commons.CommonsMultipartResolver"> <property name="defaultEncoding" value="UTF-8"></property> <!--请求的编码格式--> <property name="maxUploadSize" value="102400000"></property> <!--文件最大大小(字节) 1024*1024*50=50M--> <property name="resolveLazily" value="true"/> <!--resolveLazily属性启用是为了推迟文件解析,以便捕获文件大小异常--> <property name="uploadTempDir" value="upload"></property> <!--指定上传文件的临时文件夹,请在项目中创建好目录。--> </bean> 2.创建Controller @Controller @RequestMapping("/index") public class indexController { @RequestMapping(value = "/fileUploadPage.do", method = RequestMethod.POST) @ResponseBody public String upload(HttpServletRequest req) throws Exception{ //上传图片 MultipartHttpServletRequest mreq = (MultipartHttpServletRequest)req; MultipartFile file = mreq.getFile("file"); String fileName = file.getOriginalFilename(); SimpleDateFormat sdf = new SimpleDateFormat("yyyyMMddHHmmss"); String name=req.getSession().getServletContext().getRealPath("/")+ "upload\\"+sdf.format(new Date())+fileName.substring(fileName.lastIndexOf('.')); FileOutputStream fos = new FileOutputStream(name); fos.write(file.getBytes()); fos.flush(); fos.close(); return "/upload/"+sdf.format(new Date())+fileName.substring(fileName.lastIndexOf('.')); } } 3.创建index.jsp<form action="/index/fileUploadPage.do" enctype="multipart/form-data" method="post"> <input type="file" name="file" /> <input type="submit" value="上传"/> </form>4.测试4.1 运行界面:4.2 结果:返回图片存放地址可以在项目发布路径中查看图片
-
SSM 整合之Redis ssm整合:https://blog.csdn.net/qq_40369944/article/details/842567671.导入依赖<spring.redis.version>1.6.0.RELEASE</spring.redis.version> <jedis.version>2.7.2</jedis.version> <commons.version>2.4.2</commons.version> <!-- config redis data and client jar--> <dependency> <groupId>org.springframework.data</groupId> <artifactId>spring-data-redis</artifactId> <version>${spring.redis.version}</version> </dependency> <!-- https://mvnrepository.com/artifact/org.apache.commons/commons-pool2 --> <dependency> <groupId>org.apache.commons</groupId> <artifactId>commons-pool2</artifactId> <version>${commons.version}</version> </dependency> <!-- https://mvnrepository.com/artifact/redis.clients/jedis --> <dependency> <groupId>redis.clients</groupId> <artifactId>jedis</artifactId> <version>${jedis.version}</version> </dependency> 2.在resources中创建redis.propertiesredis.host=47.106.8.233 redis.port=6379 redis.password= redis.maxIdle=300 redis.maxWaitMillis=1000 redis.maxTotal=600 redis.testOnBorrow=true redis.testOnReturn=true 3.在resources中创建redis-context.xml<?xml version="1.0" encoding="UTF-8"?> <beans xmlns="http://www.springframework.org/schema/beans" xmlns:xsi="http://www.w3.org/2001/XMLSchema-instance" xmlns:p="http://www.springframework.org/schema/p" xmlns:context="http://www.springframework.org/schema/context" xsi:schemaLocation=" http://www.springframework.org/schema/beans http://www.springframework.org/schema/beans/spring-beans.xsd http://www.springframework.org/schema/context http://www.springframework.org/schema/context/spring-context.xsd"> <!--扫描redis配置文件--> <context:property-placeholder ignore-unresolvable="true" location="classpath:redis.properties"/> <!--设置连接池--> <bean id="poolConfig" class="redis.clients.jedis.JedisPoolConfig"> <property name="maxIdle" value="${redis.maxIdle}"/> <property name="maxTotal" value="${redis.maxTotal}" /> <property name="maxWaitMillis" value="${redis.maxWaitMillis}" /> <property name="testOnBorrow" value="${redis.testOnBorrow}" /> <property name="testOnReturn" value="${redis.testOnReturn}" /> </bean> <!--设置链接属性--> <bean id="connectionFactory" class="org.springframework.data.redis.connection.jedis.JedisConnectionFactory" p:hostName="${redis.host}" p:port="${redis.port}" p:password="${redis.password}" p:pool-config-ref="poolConfig" p:timeout="100000"/> <!-- Jedis模板配置 --> <bean id="redisTemplate" class="org.springframework.data.redis.core.StringRedisTemplate"> <property name="connectionFactory" ref="connectionFactory" /> </bean> </beans>4.在Spring.xml中引入配置<!-- 引入redis配置文件 --> <import resource="classpath:redis-context.xml"/> 5.创建RedisUtil@Component public class RedisUtil { @Autowired private RedisTemplate redisTemplate; /** * 删除对应的value * * @param key */ public void remove(final String key) { if (exists(key)) { redisTemplate.delete(key); } } /** * 判断缓存中是否有对应的value * * @param key * @return */ public boolean exists(final String key) { return redisTemplate.hasKey(key); } /** * 读取缓存 * * @param key * @return */ public Object get(final String key) { Object result = null; ValueOperations<Serializable, Object> operations = redisTemplate .opsForValue(); result = operations.get(key); return result; } /** * 写入缓存 * * @param key * @param value * @return */ public boolean set(final String key, Object value) { boolean result = false; try { ValueOperations<Serializable, Object> operations = redisTemplate .opsForValue(); operations.set(key, value); result = true; } catch (Exception e) { e.printStackTrace(); } return result; } /** * 写入缓存 * * @param key * @param value * @return */ public boolean set(final String key, Object value, Long expireTime) { boolean result = false; try { ValueOperations<Serializable, Object> operations = redisTemplate .opsForValue(); operations.set(key, value); redisTemplate.expire(key, expireTime, TimeUnit.SECONDS); result = true; } catch (Exception e) { e.printStackTrace(); } return result; } } 6.创建controller@Controller @RequestMapping("/index") public class indexController { @Resource private RedisUtil redisUtil; @RequestMapping("/a") @ResponseBody public String index(){ redisUtil.set("aa","123"); System.out.println( redisUtil.get("aa")); return "Hello"; } } 7.创建index.jsp<a href="/index/a.do">redis</a> 8.测试8.1运行界面8.2 结果 控制台输出:界面显示:
-
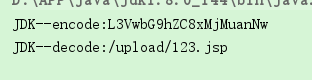
Base64加密方式 1.JDKsun.misc.BASE64Encoder/BASE64Decoder类不属于JDK标准库范畴,但在JDK中包含了该类,可以直接使用。测试:import org.junit.Test; import sun.misc.BASE64Decoder; import sun.misc.BASE64Encoder; import java.io.IOException; public class Base64Test { private String src="/upload/123.jsp"; @Test public void JDKBase64(){ //加密 BASE64Encoder encoder = new BASE64Encoder(); String encode = encoder.encode( src.getBytes() ); System.out.println( "JDK--encode:" + encode ); //解密 BASE64Decoder decoder = new BASE64Decoder(); try { byte[] decode = decoder.decodeBuffer( encode ); System.out.println( "JDK--decode:" + new String( decode ) ); } catch( IOException e ) { e.printStackTrace(); } } }结果: 2.commons-codec导入依赖: <dependency> <groupId>commons-codec</groupId> <artifactId>commons-codec</artifactId> <version>1.9</version> </dependency>测试:import org.apache.commons.codec.binary.Base64; import org.junit.Test; public class Base64Test { private String src="/upload/123.jsp"; @Test public void commonsCodecBase64() { //加密 byte[] encode = Base64.encodeBase64( src.getBytes() ); System.out.println( "commons--encode:" + new String( encode ) ); //解密 byte[] decode = Base64.decodeBase64( encode ); System.out.println( "commons--decode:" + new String( decode ) ); } }结果: 3.bouncycastle导入依赖: <dependency> <groupId>org.bouncycastle</groupId> <artifactId>bcprov-jdk15</artifactId> <version>1.46</version> </dependency>测试:import org.junit.Test; public class Base64Test { private String src="/upload/123.jsp"; @Test public void bouncyCastleBase64() { //加密 byte[] encode = org.bouncycastle.util.encoders.Base64.encode( src.getBytes() ); System.out.println( "bouncycastle--encode:" + new String( encode ) ); //解密 byte[] decode = org.bouncycastle.util.encoders.Base64.decode( encode ); System.out.println( "bouncycastle--decode:" + new String( decode ) ); } }结果:
-
org.springframework.data.redis.RedisConnectionFailureException: Cannot get Jedis connection; nested redis连接报错Type Exception ReportMessage Request processing failed; nested exception is org.springframework.data.redis.RedisConnectionFailureException: Cannot get Jedis connection; nested exception is redis.clients.jedis.exceptions.JedisConnectionException: Could not get a resource from the poolDescription The server encountered an unexpected condition that prevented it from fulfilling the request. 进入Linux,修改redis配置 config set protected-mode "no"
-
-
POI之导出Excel 下面简单给大家介绍poi导出配置1.首先导入依赖 <!--poi--> <dependency> <groupId>org.apache.poi</groupId> <artifactId>poi</artifactId> <version>3.6</version> </dependency> 2.创建工具类package javaj.work.util; import org.apache.poi.hssf.usermodel.HSSFWorkbook; import org.apache.poi.ss.usermodel.*; import javax.servlet.ServletOutputStream; import javax.servlet.http.HttpServletResponse; import java.io.*; import java.lang.reflect.Method; import java.util.ArrayList; import java.util.HashMap; import java.util.List; import java.util.Map; public class ExcelUtil { //参数说明: fileName:文件名 projects:对象集合 columnNames: 列名 keys: map中的key public static void start_download(HttpServletResponse response, String fileName, List<?> projects, String[] columnNames, String[] keys) throws IOException { //将集合中对象的属性 对应到 List<Map<String,Object>> List<Map<String,Object>> list=createExcelRecord(projects, keys); ByteArrayOutputStream os = new ByteArrayOutputStream(); try { //将转换成的Workbook对象通过流形式下载 createWorkBook(list,keys,columnNames).write(os); } catch (IOException e) { e.printStackTrace(); } byte[] content = os.toByteArray(); InputStream is = new ByteArrayInputStream(content); // 设置response参数,可以打开下载页面 response.reset(); response.setContentType("application/vnd.ms-excel;charset=utf-8"); response.setHeader("Content-Disposition", "attachment;filename="+ new String((fileName + ".xls").getBytes(), "iso-8859-1")); ServletOutputStream out = response.getOutputStream(); BufferedInputStream bis = null; BufferedOutputStream bos = null; try { bis = new BufferedInputStream(is); bos = new BufferedOutputStream(out); byte[] buff = new byte[2048]; int bytesRead; while (-1 != (bytesRead = bis.read(buff, 0, buff.length))) { bos.write(buff, 0, bytesRead); } } catch (final IOException e) { throw e; } finally { if (bis != null) bis.close(); if (bos != null) bos.close(); } } private static List<Map<String, Object>> createExcelRecord(List<?> projects, String[] keys) { List<Map<String, Object>> listmap = new ArrayList<Map<String, Object>>(); Map<String, Object> map = new HashMap<String, Object>(); map.put("sheetName", "sheet"); listmap.add(map); Object project=null; for (int j = 0; j < projects.size(); j++) { project=projects.get(j); Map<String, Object> mapValue = new HashMap<String, Object>(); for(int i=0; i<keys.length; i++){ mapValue.put(keys[i], getFieldValueByName(keys[i], project)); } listmap.add(mapValue); } return listmap; } /** * 利用反射 根据属性名获取属性值 * */ private static Object getFieldValueByName(String fieldName, Object o) { try { String firstLetter = fieldName.substring(0, 1).toUpperCase(); String getter = "get" + firstLetter + fieldName.substring(1); Method method = o.getClass().getMethod(getter, new Class[] {}); Object value = method.invoke(o, new Object[] {}); return value; } catch (Exception e) { e.printStackTrace(); return null; } } /** * 创建excel文档对象 * @param keys list中map的key数组集合 * @param columnNames excel的列名 * */ private static Workbook createWorkBook(List<Map<String, Object>> list, String []keys, String columnNames[]) { // 创建excel工作簿 Workbook wb = new HSSFWorkbook(); // 创建第一个sheet(页),并命名 Sheet sheet = wb.createSheet(list.get(0).get("sheetName").toString()); // 手动设置列宽。第一个参数表示要为第几列设;,第二个参数表示列的宽度,n为列高的像素数。 for(int i=0;i<keys.length;i++){ sheet.setColumnWidth((short) i, (short) (35.7 * 150)); } // 创建第一行 Row row = sheet.createRow((short) 0); // 创建两种单元格格式 CellStyle cs = wb.createCellStyle(); CellStyle cs2 = wb.createCellStyle(); // 创建两种字体 Font f = wb.createFont(); Font f2 = wb.createFont(); // 创建第一种字体样式(用于列名) f.setFontHeightInPoints((short) 10); f.setColor(IndexedColors.BLACK.getIndex()); f.setBoldweight(Font.BOLDWEIGHT_BOLD); // 创建第二种字体样式(用于值) f2.setFontHeightInPoints((short) 10); f2.setColor(IndexedColors.BLACK.getIndex()); // 设置第一种单元格的样式(用于列名) cs.setFont(f); cs.setBorderLeft(CellStyle.BORDER_THIN); cs.setBorderRight(CellStyle.BORDER_THIN); cs.setBorderTop(CellStyle.BORDER_THIN); cs.setBorderBottom(CellStyle.BORDER_THIN); cs.setAlignment(CellStyle.ALIGN_CENTER); // 设置第二种单元格的样式(用于值) cs2.setFont(f2); cs2.setBorderLeft(CellStyle.BORDER_THIN); cs2.setBorderRight(CellStyle.BORDER_THIN); cs2.setBorderTop(CellStyle.BORDER_THIN); cs2.setBorderBottom(CellStyle.BORDER_THIN); cs2.setAlignment(CellStyle.ALIGN_CENTER); //设置列名 for(int i=0;i<columnNames.length;i++){ Cell cell = row.createCell(i); cell.setCellValue(columnNames[i]); cell.setCellStyle(cs); } //设置每行每列的值 for (short i = 1; i < list.size(); i++) { // Row 行,Cell 方格 , Row 和 Cell 都是从0开始计数的 // 创建一行,在页sheet上 Row row1 = sheet.createRow((short) i); // 在row行上创建一个方格 for(short j=0;j<keys.length;j++){ Cell cell = row1.createCell(j); cell.setCellValue(list.get(i).get(keys[j]) == null?" ": list.get(i).get(keys[j]).toString()); cell.setCellStyle(cs2); } } return wb; } } 3.pojopublic class Student { private int no; private String name; private int age; //此处省略getter和setter } 4.配置controller@RequestMapping(value = "download") public void index(HttpServletResponse response){ String fileName = "人员档案列表"; List<Student> students = new ArrayList<Student>(); for (int i = 0;i<20 ;i++){ Student student = new Student(); student.setAge(i+10); student.setName("张三"+i); student.setNo(i); students.add(student); } // 列名 String columnNames[] = { "ID", "姓名", "年龄" }; // map中的key String keys[] = { "no", "name", "age" }; try { ExcelUtil.start_download(response, fileName, students,columnNames, keys); } catch (IOException e) { e.printStackTrace(); } } 5.页面<a href="download.do">导出Excel</a>


![Element 'dependency' cannot have character [children], because the type's content type is element-on](https://img-blog.csdnimg.cn/20181121100228535.png)