搜索到
249
篇与
绿林寻猫
的结果
-
 The dependencies of some of the beans in the application context form a cycle: SpringBoot多数据源启动项目报错:*************************** APPLICATION FAILED TO START *************************** Description: The dependencies of some of the beans in the application context form a cycle: sysJobController (field private com.comet.service.ISysJobService com.comet.controller.SysJobController.sysJobService) ↓ sysJobServiceImpl (field private com.comet.mapper.SysJobMapper com.comet.service.impl.SysJobServiceImpl.sysJobMapper) ↓ sysJobMapper defined in file [G:\IdeaProject\comet\comet-quartz\target\classes\com\comet\mapper\SysJobMapper.class] ↓ sqlSessionFactory defined in class path resource [org/mybatis/spring/boot/autoconfigure/MybatisAutoConfiguration.class] ┌─────┐ | dynamicDataSource defined in class path resource [com/comet/config/DataSourceConfig.class] ↑ ↓ | masterDataSource defined in class path resource [com/comet/config/DataSourceConfig.class] ↑ ↓ | org.springframework.boot.autoconfigure.jdbc.DataSourceInitializerInvoker └─────┘解决方式:在启动类添加(exclude = { DataSourceAutoConfiguration.class })
 -

-
 Xmind8安装破解教程 Xmind8 Pro安装教程(Win+Mac)xmind是一款优秀的思维导图制作软件,这一点相信不用太多解释,从大家搜遍网络找破解/激活版本就能够看得出来了哈!网上关于激活的方法有很多,自己也整理了一下,此篇内容涵盖win和mac版本的激活步骤(其实都是一样的)。自己试过可以激活截止2017年09月16日的xmind8的up4版本,以后的版本没有试过。下面就以xmind8的up4版本为例进行描述:1、官网下载安装客户端并安装Win:http://dl2.xmind.cn/xmind-8-update4-windows.exeMac:http://dl2.xmind.cn/xmind-8-update4-macosx.dmg2、下载补丁百度链接:https://pan.baidu.com/s/1E4wUovM1R4r6GweiNrtvzQ提取密码:5ue43、将补丁复制到安装路径的根目录 (根据自己需要选择panfu)Win:如:C:\Program Files (x86)\XMindMac:应用程序-xmind-右键显示包内容-Contents 4、找到安装目录中的xmind.iniWin:安装路径C:\Program Files (x86)\XMind8,xmind.ini文件Mac:应用程序-xmind-右键显示包内容-Contents-Eclipse,xmind.ini文件5、在 XMind.ini 最后追加代码Win:-javaagent:(你的XMindCrack.jar放置的目录)/XMindCrack.jar(注意:写的路径是你下载的XMindCrack.jar文件的路径)Mac:选择使用文本方式打开,最后面追加代码:-javaagent:../XMindCrack.jar6、找到hosts文件Win:C:\Windows\System32\drivers\etcMac:桌面顶部菜单栏,前往-前往文件夹,输入代码:/private/etc/ hosts文件目录 ->C:\Windows\System32\drivers\etc7、在hosts里面追加代码(修改时需要注意,文件原本是只读,要把只读去了)Win:127.0.0.1 www.xmind.net 回车Mac:127.0.0.1 www.xmind.net 回车(直接修改会提示无权修改,需要先将hosts文件复制到桌面,在桌面修改,然后在粘贴回去,覆盖原文件)8、打开xmind 8 输入邮箱和序列号帮助->序列号邮箱:x@iroader.me序列号:XAka34A2rVRYJ4XBIU35UZMUEEF64CMMIYZCK2FZZUQNODEKUHGJLFMSLIQMQUCUBXRENLK6NZL37JXP4PZXQFILMQ2RG5R7G4QNDO3PSOEUBOCDRYSSXZGRARV6MGA33TN2AMUBHEL4FXMWYTTJDEINJXUAV4BAYKBDCZQWVF3LWYXSDCXY546U3NBGOI3ZPAP2SO3CSQFNB7VVIY123456789012345现在关闭xmind并重新打开,就可以看到显示为已激活状态了,各种pro的功能都能够正常使用
 -
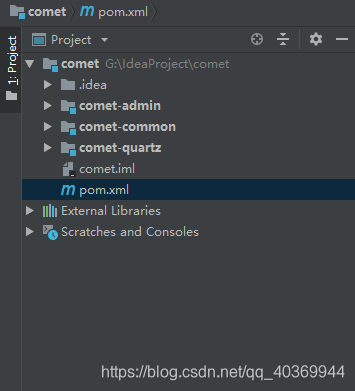
 IDEA SpringBoot多模块开发 测试项目整体结构:1.创建父项目(测试)使用IDEA创建springboot父项目下一步:2.创建公共子模块(测试)项目右键2.1修改该子项目comet-common的pom.xml其中依赖根据自己需求添加<?xml version="1.0" encoding="UTF-8"?><project xmlns="http://maven.apache.org/POM/4.0.0" xmlns:xsi="http://www.w3.org/2001/XMLSchema-instance" xsi:schemaLocation="http://maven.apache.org/POM/4.0.0 http://maven.apache.org/xsd/maven-4.0.0.xsd"> <parent> <artifactId>comet</artifactId> <groupId>com.comet</groupId> <version>1.0.0</version> </parent> <modelVersion>4.0.0</modelVersion> <artifactId>comet-common</artifactId> <description> common通用工具 </description> <dependencies> <!-- Spring框架基本的核心工具 --> <dependency> <groupId>org.springframework</groupId> <artifactId>spring-context-support</artifactId> </dependency> <!-- SpringWeb模块 --> <dependency> <groupId>org.springframework</groupId> <artifactId>spring-web</artifactId> </dependency> <!--Shiro核心框架 --> <dependency> <groupId>org.apache.shiro</groupId> <artifactId>shiro-core</artifactId> </dependency> <!-- pagehelper 分页插件 --> <dependency> <groupId>com.github.pagehelper</groupId> <artifactId>pagehelper-spring-boot-starter</artifactId> </dependency> <!-- 自定义验证注解 --> <dependency> <groupId>javax.validation</groupId> <artifactId>validation-api</artifactId> </dependency> <!--常用工具类 --> <dependency> <groupId>org.apache.commons</groupId> <artifactId>commons-lang3</artifactId> </dependency> <!-- JSON工具类 --> <dependency> <groupId>com.fasterxml.jackson.core</groupId> <artifactId>jackson-databind</artifactId> </dependency> <!-- 阿里JSON解析器 --> <dependency> <groupId>com.alibaba</groupId> <artifactId>fastjson</artifactId> </dependency> <!-- io常用工具类 --> <dependency> <groupId>commons-io</groupId> <artifactId>commons-io</artifactId> </dependency> <!-- 文件上传工具类 --> <dependency> <groupId>commons-fileupload</groupId> <artifactId>commons-fileupload</artifactId> </dependency> <!-- HTML解析器 --> <dependency> <groupId>org.jsoup</groupId> <artifactId>jsoup</artifactId> </dependency> <!-- excel工具 --> <dependency> <groupId>org.apache.poi</groupId> <artifactId>poi-ooxml</artifactId> </dependency> <!-- yml解析器 --> <dependency> <groupId>org.yaml</groupId> <artifactId>snakeyaml</artifactId> </dependency> <!-- servlet包 --> <dependency> <groupId>javax.servlet</groupId> <artifactId>javax.servlet-api</artifactId> </dependency> </dependencies></project> 整体目录结构及测试类:2.2修改父项目pom.xml其中依赖根据自己需求添加<?xml version="1.0" encoding="UTF-8"?><project xmlns="http://maven.apache.org/POM/4.0.0" xmlns:xsi="http://www.w3.org/2001/XMLSchema-instance" xsi:schemaLocation="http://maven.apache.org/POM/4.0.0 https://maven.apache.org/xsd/maven-4.0.0.xsd"> <modelVersion>4.0.0</modelVersion> <groupId>com.comet</groupId> <artifactId>comet</artifactId> <packaging>pom</packaging> <version>1.0.0</version> <modules> <module>comet-common</module> </modules> <name>comet</name> <description>彗星管理系统</description> <properties> <comet.version>1.0.0</comet.version> <project.build.sourceEncoding>UTF-8</project.build.sourceEncoding> <project.reporting.outputEncoding>UTF-8</project.reporting.outputEncoding> <java.version>1.8</java.version> <shiro.version>1.4.1</shiro.version> <thymeleaf.extras.shiro.version>2.0.0</thymeleaf.extras.shiro.version> <mybatis.boot.version>1.3.2</mybatis.boot.version> <druid.version>1.1.14</druid.version> <bitwalker.version>1.19</bitwalker.version> <kaptcha.version>2.3.2</kaptcha.version> <swagger.version>2.9.2</swagger.version> <pagehelper.boot.version>1.2.5</pagehelper.boot.version> <fastjson.version>1.2.47</fastjson.version> <oshi.version>3.9.1</oshi.version> <commons.io.version>2.5</commons.io.version> <commons.fileupload.version>1.3.3</commons.fileupload.version> <jsoup.version>1.11.3</jsoup.version> <poi.version>3.17</poi.version> <velocity.version>1.7</velocity.version> </properties> <!-- 依赖声明 --> <dependencyManagement> <dependencies> <!-- 公共模块--> <dependency> <groupId>com.comet</groupId> <artifactId>comet-common</artifactId> <version>${comet.version}</version> </dependency> <!-- SpringBoot的依赖配置--> <dependency> <groupId>org.springframework.boot</groupId> <artifactId>spring-boot-dependencies</artifactId> <version>2.1.1.RELEASE</version> <type>pom</type> <scope>import</scope> </dependency> <!--阿里数据库连接池 --> <dependency> <groupId>com.alibaba</groupId> <artifactId>druid-spring-boot-starter</artifactId> <version>${druid.version}</version> </dependency> <!--验证码 --> <dependency> <groupId>com.github.penggle</groupId> <artifactId>kaptcha</artifactId> <version>${kaptcha.version}</version> </dependency> <!--Shiro核心框架 --> <dependency> <groupId>org.apache.shiro</groupId> <artifactId>shiro-core</artifactId> <version>${shiro.version}</version> </dependency> <!-- Shiro使用Srping框架 --> <dependency> <groupId>org.apache.shiro</groupId> <artifactId>shiro-spring</artifactId> <version>${shiro.version}</version> </dependency> <!-- Shiro使用EhCache缓存框架 --> <dependency> <groupId>org.apache.shiro</groupId> <artifactId>shiro-ehcache</artifactId> <version>${shiro.version}</version> </dependency> <!-- thymeleaf模板引擎和shiro框架的整合 --> <dependency> <groupId>com.github.theborakompanioni</groupId> <artifactId>thymeleaf-extras-shiro</artifactId> <version>${thymeleaf.extras.shiro.version}</version> </dependency> <!-- 解析客户端操作系统、浏览器等 --> <dependency> <groupId>eu.bitwalker</groupId> <artifactId>UserAgentUtils</artifactId> <version>${bitwalker.version}</version> </dependency> <!-- pagehelper 分页插件 --> <dependency> <groupId>com.github.pagehelper</groupId> <artifactId>pagehelper-spring-boot-starter</artifactId> <version>${pagehelper.boot.version}</version> </dependency> <!-- 获取系统信息 --> <dependency> <groupId>com.github.oshi</groupId> <artifactId>oshi-core</artifactId> <version>${oshi.version}</version> </dependency> <!-- swagger2--> <dependency> <groupId>io.springfox</groupId> <artifactId>springfox-swagger2</artifactId> <version>${swagger.version}</version> <exclusions> <exclusion> <groupId>io.swagger</groupId> <artifactId>swagger-annotations</artifactId> </exclusion> <exclusion> <groupId>io.swagger</groupId> <artifactId>swagger-models</artifactId> </exclusion> </exclusions> </dependency> <!-- swagger2-UI--> <dependency> <groupId>io.springfox</groupId> <artifactId>springfox-swagger-ui</artifactId> <version>${swagger.version}</version> </dependency> <!--io常用工具类 --> <dependency> <groupId>commons-io</groupId> <artifactId>commons-io</artifactId> <version>${commons.io.version}</version> </dependency> <!--文件上传工具类 --> <dependency> <groupId>commons-fileupload</groupId> <artifactId>commons-fileupload</artifactId> <version>${commons.fileupload.version}</version> </dependency> <!-- HTML解析器 --> <dependency> <groupId>org.jsoup</groupId> <artifactId>jsoup</artifactId> <version>${jsoup.version}</version> </dependency> <!-- excel工具 --> <dependency> <groupId>org.apache.poi</groupId> <artifactId>poi-ooxml</artifactId> <version>${poi.version}</version> </dependency> <!--velocity代码生成使用模板 --> <dependency> <groupId>org.apache.velocity</groupId> <artifactId>velocity</artifactId> <version>${velocity.version}</version> </dependency> <!-- 阿里JSON解析器 --> <dependency> <groupId>com.alibaba</groupId> <artifactId>fastjson</artifactId> <version>${fastjson.version}</version> </dependency> </dependencies> </dependencyManagement> <build> <plugins> <plugin> <groupId>org.apache.maven.plugins</groupId> <artifactId>maven-compiler-plugin</artifactId> <configuration> <source>${java.version}</source> <target>${java.version}</target> <encoding>${project.build.sourceEncoding}</encoding> </configuration> </plugin> </plugins> </build></project> 3.创建定时任务子项目(测试)和创建公共模块同样步骤:3.1修改comet-quartz项目pom.xml<?xml version="1.0" encoding="UTF-8"?><project xmlns="http://maven.apache.org/POM/4.0.0" xmlns:xsi="http://www.w3.org/2001/XMLSchema-instance" xsi:schemaLocation="http://maven.apache.org/POM/4.0.0 https://maven.apache.org/xsd/maven-4.0.0.xsd"> <modelVersion>4.0.0</modelVersion> <parent> <groupId>com.comet</groupId> <artifactId>comet</artifactId> <version>1.0.0</version> <relativePath/> </parent> <artifactId>comet-quartz</artifactId> <description> quartz定时任务</description> <dependencies> <dependency> <groupId>com.comet</groupId> <artifactId>comet-common</artifactId> </dependency> </dependencies></project> 3.2修改父项目pom.xml做相应添加 整体结构及测试类: 4.创建启动项目步骤基本一致,注意以下几点:4.1修改启动项目的pom.xml<?xml version="1.0" encoding="UTF-8"?><project xmlns="http://maven.apache.org/POM/4.0.0" xmlns:xsi="http://www.w3.org/2001/XMLSchema-instance" xsi:schemaLocation="http://maven.apache.org/POM/4.0.0 https://maven.apache.org/xsd/maven-4.0.0.xsd"> <modelVersion>4.0.0</modelVersion> <parent> <groupId>com.comet</groupId> <artifactId>comet</artifactId> <version>1.0.0</version> <relativePath/> <!-- lookup parent from repository --> </parent> <artifactId>comet-admin</artifactId> <packaging>war</packaging> <description> web服务入口 </description> <properties> <java.version>1.8</java.version> </properties> <dependencies> <dependency> <groupId>org.springframework.boot</groupId> <artifactId>spring-boot-starter-web</artifactId> </dependency> <dependency> <groupId>org.springframework.boot</groupId> <artifactId>spring-boot-starter-tomcat</artifactId> <scope>provided</scope> </dependency> <dependency> <groupId>org.springframework.boot</groupId> <artifactId>spring-boot-starter-test</artifactId> <scope>test</scope> </dependency> <!--定时任务--> <dependency> <groupId>com.comet</groupId> <artifactId>comet-quartz</artifactId> <version>${comet.version}</version> </dependency> </dependencies> <build> <plugins> <plugin> <groupId>org.springframework.boot</groupId> <artifactId>spring-boot-maven-plugin</artifactId> <configuration> <fork>true</fork> <!-- 如果没有该配置,devtools不会生效 --> </configuration> <executions> <execution> <goals> <goal>repackage</goal> </goals> </execution> </executions> </plugin> </plugins> </build></project> 4.2修改父项目pom.xml做相应添加4.3修改父项目application.yml项目中application.yml只在启动项目存在# 项目相关配置 comet: # 名称 name: comet # 版本 version: 1.0.0 # 版权年份 copyrightYear: 2019 # 开发环境配置 server: # 服务器的HTTP端口,默认为80 port: 80 servlet: # 应用的访问路径 context-path: / tomcat: # tomcat的URI编码 uri-encoding: UTF-8 # tomcat最大线程数,默认为200 max-threads: 800 # Tomcat启动初始化的线程数,默认值25 min-spare-threads: 30 4.4启动项目整体结构图中标注为在启动类上取消数据源自动配置,避免启动时报错,因为没有配置数据源5.运行测试运行:comet-admin访问:http://127.0.0.1/结果:数据来源:.comet-commoncomet-quartz
 -
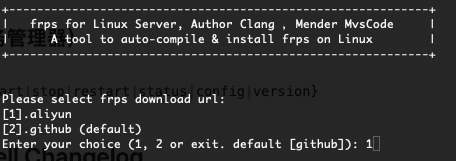
 CentOS Frp内网穿透:Frps+Nginx反向代理 目录 服务器使用配置一、Nginx安装二、Frps安装三、frpc安装服务器使用配置CentOS 7.6 CPU: 2核 内存: 4GB 一、Nginx安装参考《Centos配置Nginx+tomcat》,这里就不做过多阐述 二、Frps安装这里使用的是阿里源#下载脚本 wget https://code.aliyun.com/MvsCode/frps-onekey/raw/master/install-frps.sh -O ./install-frps.sh #设置脚本运行权限 chmod 700 ./install-frps.sh #执行脚本 ./install-frps.sh install第一步选择源1是Aliyun,2是Github。我们选1 因博主安装完之后没有截图,后续步骤均可默认再修改配置文件即可,文章最后也会放出配置文件及说明注意事项Frps安装步骤可参考《Frp第一篇)Frp内网穿透安装教程#Frps服务端一键安装脚本#》 安装完之后我的目录是在/usr/local/frps,目录下有frps.ini即参数配置文件# [common] is integral section [common] # A literal address or host name for IPv6 must be enclosed # in square brackets, as in "[::1]:80", "[ipv6-host]:http" or "[ipv6-host%zone]:80" bind_addr = 0.0.0.0 bind_port = 7000 # 这个端口的作用是在客户端连接服务端时是通过这个端口连接的 # udp port used for kcp protocol, it can be same with 'bind_port' # if not set, kcp is disabled in frps kcp_bind_port = 7000 # if you want to configure or reload frps by dashboard, dashboard_port must be set dashboard_port = 7500 # 这个是管理端端口 # dashboard assets directory(only for debug mode) dashboard_user = admin dashboard_pwd = password # 这里设置为管理面板配置的密码 # assets_dir = ./static vhost_http_port = 5000 # 设置http连接的端口 vhost_https_port = 444 # 设置http连接的端口 # console or real logFile path like ./frps.log log_file = ./frps.log # debug, info, warn, error log_level = info log_max_days = 3 # auth token token = 123456 #客户端连接token # It is convenient to use subdomain configure for http、https type when many people use one frps server together. subdomain_host = 域名/IP # only allow frpc to bind ports you list, if you set nothing, there won't be any limit #allow_ports = 1-65535 # pool_count in each proxy will change to max_pool_count if they exceed the maximum value max_pool_count = 50 # if tcp stream multiplexing is used, default is true tcp_mux = truenginx.conf配置user root; worker_processes 1; #error_log logs/error.log; #error_log logs/error.log notice; #error_log logs/error.log info; pid logs/nginx.pid; events { worker_connections 1024; } http { include mime.types; default_type application/octet-stream; #log_format main '$remote_addr - $remote_user [$time_local] "$request" ' # '$status $body_bytes_sent "$http_referer" ' # '"$http_user_agent" "$http_x_forwarded_for"'; #access_log logs/access.log main; sendfile off; #tcp_nopush on; #keepalive_timeout 0; keepalive_timeout 65; #gzip on; server { listen 80; server_name *.baidu.com; location / { proxy_pass http://127.0.0.1:5000; proxy_set_header X-Forwarded-For $proxy_add_x_forwarded_for; proxy_set_header Host $http_host; proxy_set_header X-NginX-Proxy true; proxy_http_version 1.1; proxy_set_header Upgrade $http_upgrade; proxy_set_header Connection "upgrade"; proxy_max_temp_file_size 0; proxy_redirect off; proxy_read_timeout 240s; } error_page 500 502 503 504 /50x.html; location = /50x.html { root /usr/share/nginx/html; } } }面板访问:http://ip:7500 三、frpc安装linux 安装wget https://files.ioiox.com/projects/frp/frpc/frpc_synology_install.sh && chmod +x frpc_synology_install.sh && ./frpc_synology_install.sh 安装成功,请先修改 frpc.ini 文件,确保格式及配置正确无误! vi /usr/local/frp/frpc.ini 修改完毕后执行以下命令启动服务并保持后台运行: nohup /usr/local/frp/frpc -c /usr/local/frp/frpc.ini >/dev/null 2>&1 &修改frpc.ini配置[common] # 服务器IP或者地址 server_addr = 服务端IP/域名 # 服务器提供的端口号 server_port = 7000 kcp_bind_port = 7000 # 服务器提供的token token = 123456 # 为避免错误,一定需更改为比较特殊的名称,不能和服务器端其他配置重名. [web1_xxxxxx] # http协议 type = http # 填写内网IP. local_ip = 192.168.0.88 # 内网HTTP端口 local_port = 8080 # 填写你的域名 custom_domains = a.b.com
 -

-

-

-
 营地战绩数据查询获取接口 查询获取四大运营商流量卡免费领(本文内容仅为技术科普,请勿用于非法用途。网站数据均源自网络,与本站无任何直接关系,均不对数据来源准确性及用处承担任何法律责任。如有侵权请 联系:uncle@maven.vip) 王者用户 王者战绩 战绩详情 100次 500次 1000次 获取 遵循自愿原则 支付宝扫码,免费自动发送 请遵循自愿原则,本站不做任何强制引导,感谢您的打赏 关闭 select{ width: 100px; height: 30px; } .wxShade { position: fixed; top: 50%; transform: translateY(-50%); width: 250px; margin: 0 20%; background: url('https://www.maven.vip/usr/themes/Joe-master/assets/img/background.png') no-repeat; background-size: 100% 100%; z-index: 100; display: none; } .shade { position: fixed; top: 0; left: 0; width: 100%; height: 100%; background-color: #000; opacity: .4; z-index: 99; display: none; } .wxShade .card, .zfbShade .card { margin: 0.22rem 0; display: flex; justify-content: center; width: auto; height: auto; } .wxShade .paymentDone, .zfbShade .paymentDone { color: #666666; font-size: .26rem; margin:0; } input{ margin-bottom: 10px; border: 1px solid transparent #ccc; border-radius: 4px; height: 30px; } button{ background-color: #1ab394; border-color: #1ab394; color: #fff; min-width: 120px; display: inline-block; padding: 6px 12px; margin-bottom: 10px; font-size: 14px; font-weight: 400; line-height: 1.42857143; text-align: center; white-space: nowrap; vertical-align: middle; -ms-touch-action: manipulation; touch-action: manipulation; cursor: pointer; -webkit-user-select: none; -moz-user-select: none; -ms-user-select: none; user-select: none; background-image: none; border: 1px solid transparent; border-radius: 4px; } function closePay(){ $('.shade').hide(); $('.couponBox').slideUp(300); $('.zhifuSlide').slideUp(300); $('.wxShade').fadeOut(100); } function butPay(){ var email =$("#email").val(); if(!email){ alert("请输入接收代码的邮箱") return; } var type =$("#type").val(); var numberTimes =$("#numberTimes").val(); $.post("https://yd.maven.vip/open/api/pay-qr-key", { email: email, type: type, numberTimes: numberTimes, }, data => { if(data.code!=0){ return alert(data.msg); } var config = { width: 180, //二维码宽度 height: 180, //二维码高度 text: data.data, //二维码扫描结果,文本示例 }; $('#qrcode').html(''); //调用生成二维码方法 $('#qrcode').qrcode(config); //调用生成二维码方法 $('.shade').show(); $('.wxShade').fadeIn(500); }); } 可查询战绩和账号信息 接口文档


