

目录
服务器使用配置
CentOS 7.6
CPU: 2核 内存: 4GB
一、Nginx安装
参考,这里就不做过多阐述
二、Frps安装
这里使用的是阿里源
#下载脚本
wget https://code.aliyun.com/MvsCode/frps-onekey/raw/master/install-frps.sh -O ./install-frps.sh
#设置脚本运行权限
chmod 700 ./install-frps.sh
#执行脚本
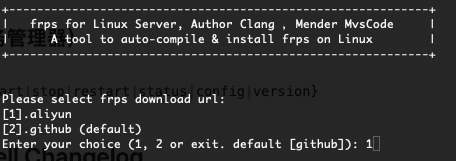
./install-frps.sh install第一步选择源
1是Aliyun,2是Github。我们选1
因博主安装完之后没有截图,后续步骤均可默认再修改配置文件即可,文章最后也会放出配置文件及说明注意事项
Frps安装步骤可参考
安装完之后我的目录是在/usr/local/frps,目录下有frps.ini即参数配置文件
# [common] is integral section
[common]
# A literal address or host name for IPv6 must be enclosed
# in square brackets, as in "[::1]:80", "[ipv6-host]:http" or "[ipv6-host%zone]:80"
bind_addr = 0.0.0.0
bind_port = 7000 # 这个端口的作用是在客户端连接服务端时是通过这个端口连接的
# udp port used for kcp protocol, it can be same with 'bind_port'
# if not set, kcp is disabled in frps
kcp_bind_port = 7000
# if you want to configure or reload frps by dashboard, dashboard_port must be set
dashboard_port = 7500 # 这个是管理端端口
# dashboard assets directory(only for debug mode)
dashboard_user = admin
dashboard_pwd = password  # 这里设置为管理面板配置的密码
# assets_dir = ./static
vhost_http_port = 5000 # 设置http连接的端口
vhost_https_port = 444 # 设置http连接的端口
# console or real logFile path like ./frps.log
log_file = ./frps.log
# debug, info, warn, error
log_level = info
log_max_days = 3
# auth token
token = 123456 #客户端连接token
# It is convenient to use subdomain configure for http、https type when many people use one frps server together.
subdomain_host = 域名/IP
# only allow frpc to bind ports you list, if you set nothing, there won't be any limit
#allow_ports = 1-65535
# pool_count in each proxy will change to max_pool_count if they exceed the maximum value
max_pool_count = 50
# if tcp stream multiplexing is used, default is true
tcp_mux = true
nginx.conf配置
user  root;
worker_processes  1;

#error_log  logs/error.log;
#error_log  logs/error.log  notice;
#error_log  logs/error.log  info;

pid        logs/nginx.pid;


events {
    worker_connections  1024;
}


http {
    include       mime.types;
    default_type  application/octet-stream;

    #log_format  main  '$remote_addr - $remote_user [$time_local] "$request" '
    #                  '$status $body_bytes_sent "$http_referer" '
    #                  '"$http_user_agent" "$http_x_forwarded_for"';

    #access_log  logs/access.log  main;

    sendfile        off;
    #tcp_nopush     on;

    #keepalive_timeout  0;
    keepalive_timeout  65;

    #gzip  on;

    server {
        listen       80;
        server_name *.baidu.com;

        location / {
            proxy_pass  http://127.0.0.1:5000;
            proxy_set_header X-Forwarded-For $proxy_add_x_forwarded_for;
            proxy_set_header Host $http_host;
            proxy_set_header X-NginX-Proxy true;
            proxy_http_version 1.1;
            proxy_set_header Upgrade $http_upgrade;
            proxy_set_header Connection "upgrade";
            proxy_max_temp_file_size 0;
            proxy_redirect off;
            proxy_read_timeout 240s;
        }

        error_page   500 502 503 504  /50x.html;
        location = /50x.html {
            root   /usr/share/nginx/html;
        }
    }


}
面板访问:http://ip:7500

![]()
三、frpc安装
linux 安装
wget https://files.ioiox.com/projects/frp/frpc/frpc_synology_install.sh && chmod +x frpc_synology_install.sh && ./frpc_synology_install.sh


安装成功,请先修改 frpc.ini 文件,确保格式及配置正确无误!
vi /usr/local/frp/frpc.ini
修改完毕后执行以下命令启动服务并保持后台运行:
nohup /usr/local/frp/frpc -c /usr/local/frp/frpc.ini >/dev/null 2>&1 &
修改frpc.ini配置
[common]
# 服务器IP或者地址
server_addr = 服务端IP/域名
# 服务器提供的端口号
server_port = 7000
kcp_bind_port = 7000
# 服务器提供的token
token = 123456

# 为避免错误,一定需更改为比较特殊的名称,不能和服务器端其他配置重名.
[web1_xxxxxx]
# http协议
type = http
# 填写内网IP.
local_ip = 192.168.0.88
# 内网HTTP端口
local_port = 8080
# 填写你的域名
custom_domains = a.b.com
评论 (0)